Basic ESP32 Control DC motor 2CH by L298 Module

โครงงานนี้จะเป็นการควบคุม DC Motor โดยใช้บอร์ฺด ESP32 Devkit จำนวน 2 ช่อง ซึ่งเป็นการทดลองเบื้องต้น สำหรับการควบคุมระหว่างบอร์ด ESP32 Devkit กับ L298 Module ทั้งนี้สัญญาณที่ได้จาก ESP32 นั้นจะมีขนาดประมาณ 3.3Vp-p (เท่ากับไฟเลี้ยงภายใน) รวมทั้งสังเกตการทำงานว่าสามารถทำงานร่วมกันได้อย่างถูกต้อง
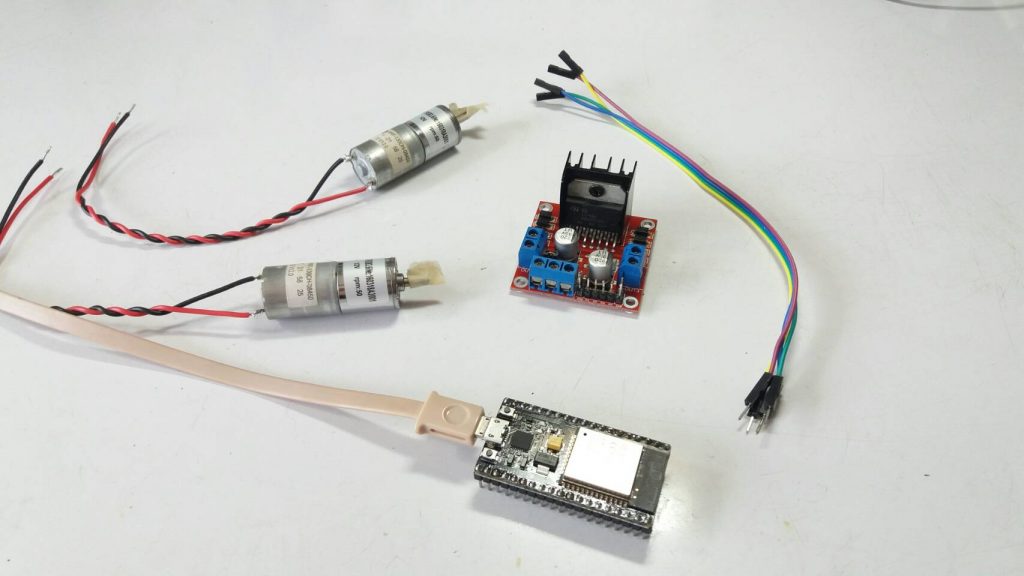
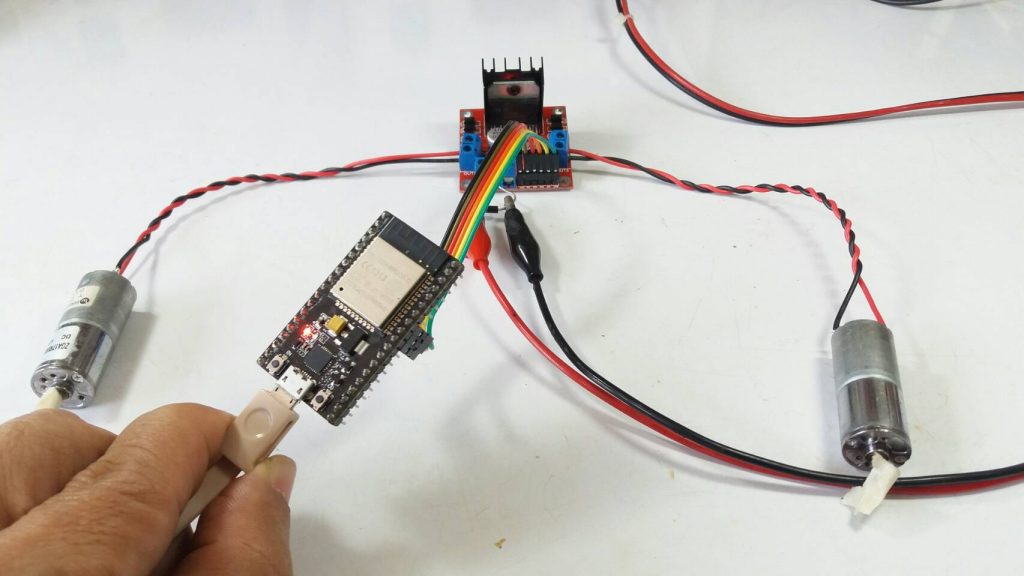
ในรูปข้างบนเป็นอุปกรณ์ที่ใช้ในการทดลองต่างๆ ซึ่งจะประกอบด้วยบอร์ด ESP32 Devkit, L298 Module, DC Motor ขนาด 12V จำนวน 2 ตัวและสายเชื่อมต่อ (Connection wires) ระหว่างอุปกรณ์ทั้งหมดเข้าด้วยกัน

ในรูปข้างบนเป็๋นลักษณะการเชื่อมต่ออุปกรณ์ต่างๆ เข้าด้วยกันสำหรับทดลอง โดยเราจะต้องมีแหล่งจ่ายไฟเลี้ยงขนาด 12V อีก 1 ส่วนสำหรับจ่ายให้กับตัวมอเตอร์ ในรูปจะเป็นที่ตำแหน่งปากคีบสีแดงและสีดำ

ใช้บอร์ด ESP32 Devkit ที่มีจำหน่ายทั่วไป หรือสามารถสั่งซื้อออนไลน์ได้จากหลายๆ ที่เลยครับ
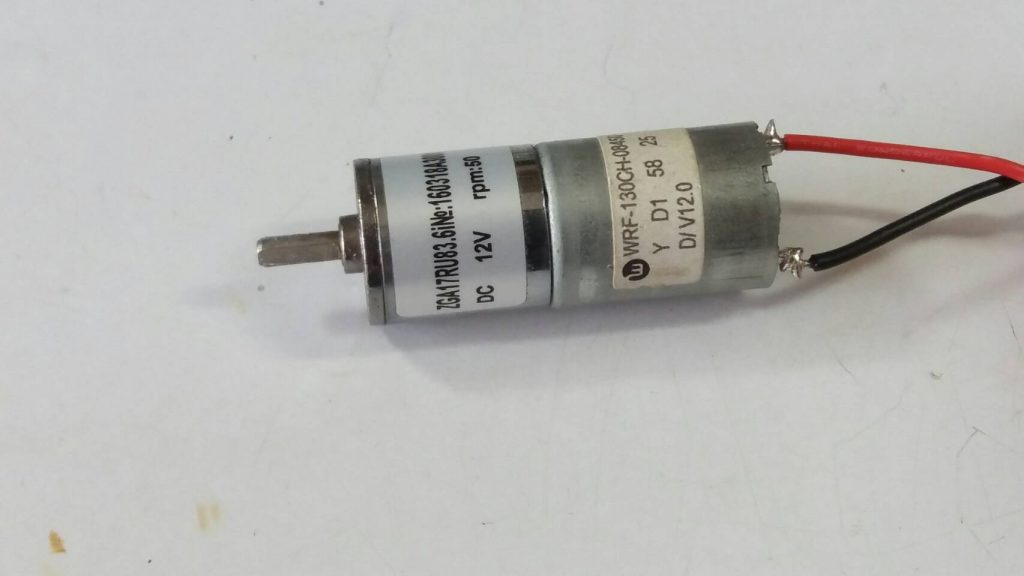
สำหรับมอเตอร์ที่ใช้ในการทดลองนี้จะเป็นมอเตอร์เกียร์ กระแสตรงขนาด 12V, rpm:50 Model : ZGA17RU83.6i
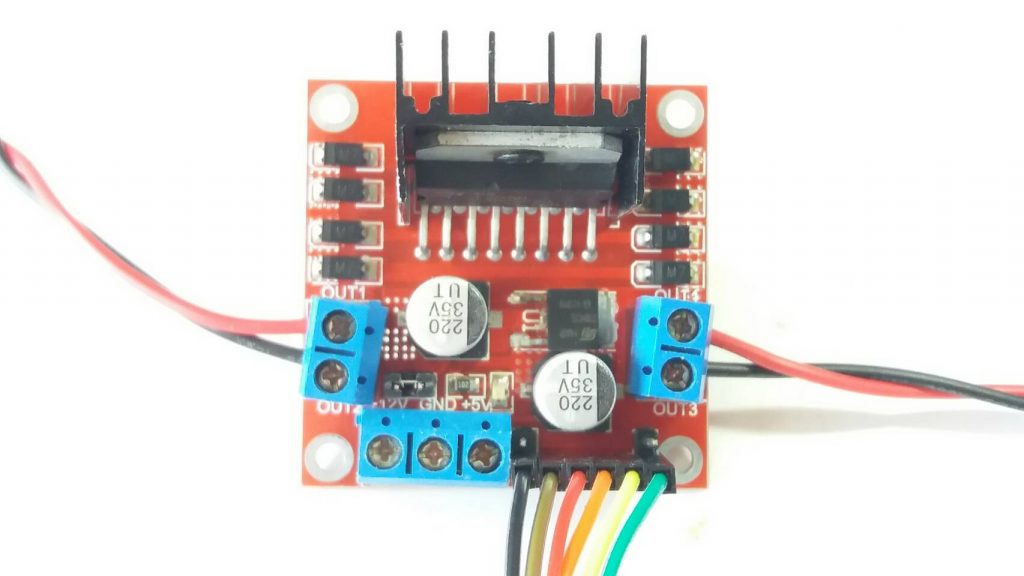
สุดท้ายจะเป็น L298 Module สำหรับมอเตอร์กระแสตรงได้ทันที และตัวโมดูลสามารถควบคุมทิศทางการหมุน และจุดต่อคอนเน็กเตอร์สำหรับไฟเลี้ยง 12V, ต่อกับมอเตอร์และบอร์ด ESP32 Devkit ได้สะดวก
ตัวอย่างโปรแกรมทดลองการทำงาน
 /*
code Program ESP32 for Control DC Motor and L298 Module
*https://randomnerdtutorials.com/esp32-dc-motor-l298n-motor-driver-control-speed-direction/
*/

int motor1Pin1 = 27;    // Set pin for Motor A
int motor1Pin2 = 26;
int enable1Pin = 14;
int motor2Pin1 = 18;    // Set pin for Motor B
int motor2Pin2 = 5;
int enable2Pin = 19;

// Setting PWM properties
const int freq = 500;
const int pwmChannel = 0;
const int pwmChanne2 = 1;
const int resolution = 8;
int dutyCycle = 200;

void setup() {
// sets the pins as outputs
pinMode(motor1Pin1, OUTPUT);
pinMode(motor1Pin2, OUTPUT);
pinMode(enable1Pin, OUTPUT);
pinMode(motor2Pin1, OUTPUT);

pinMode(motor2Pin2, OUTPUT);
pinMode(enable2Pin, OUTPUT);
// configure LED PWM functionalitites
ledcSetup(pwmChannel, freq, resolution);
// attach the channel to the GPIO to be controlled
ledcAttachPin(enable1Pin, pwmChannel);
ledcAttachPin(enable2Pin, pwmChanne2);
Serial.begin(115200);
Serial.print(Testing DC Motor);

}
void loop() {
// Move the DC motor forward at maximum speed
Serial.println("Moving Forward");
digitalWrite(motor1Pin1, LOW);
digitalWrite(motor1Pin2, HIGH);
digitalWrite(motor2Pin1, LOW);
digitalWrite(motor2Pin2, HIGH);
delay(2000);

// Stop the DC motor
Serial.println("Motor stopped");
digitalWrite(motor1Pin1, LOW);
digitalWrite(motor1Pin2, LOW);
digitalWrite(motor2Pin1, LOW);
digitalWrite(motor2Pin2, LOW);
delay(1000);

// Move DC motor backwards at maximum speed
Serial.println("Moving Backwards");
digitalWrite(motor1Pin1, HIGH);
digitalWrite(motor1Pin2, LOW);
digitalWrite(motor2Pin1, HIGH);
digitalWrite(motor2Pin2, LOW);
delay(2000);

// Stop the DC motor
Serial.println("Motor stopped");
digitalWrite(motor1Pin1, LOW);
digitalWrite(motor1Pin2, LOW);
digitalWrite(motor2Pin1, LOW);
digitalWrite(motor2Pin2, LOW);
delay(1000);

// Move DC motor forward with increasing speed
digitalWrite(motor1Pin1, HIGH);
digitalWrite(motor1Pin2, LOW);
digitalWrite(motor2Pin1, HIGH);
digitalWrite(motor2Pin2, LOW);

while (dutyCycle <= 255){
ledcWrite(pwmChannel, dutyCycle);
ledcWrite(pwmChanne2, dutyCycle);
Serial.print("Forward with duty cycle: ");
Serial.println(dutyCycle);
dutyCycle = dutyCycle + 5;
delay(300);
}
dutyCycle = 150;
}
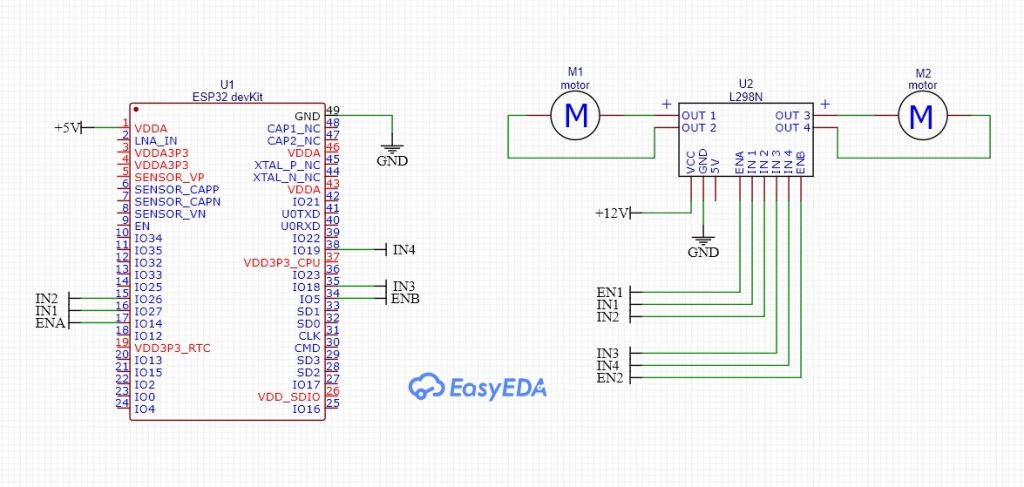
ลักษณะของการต่อวงจรแสดงในรูปข้างบน ซึ่งในวงจรจะมีแหล่งจ่ายไฟขนาด 12V เพิ่มอีก 1 ส่วน เพื่อจ่ายให้กับตัวมอเตอร์ทั้ง 2 ตัว และตัวโมดูล L298 Module จะใช้แหล่งจ่ายนี้จ่ายให้กับตัวมอเตอร์ และเราสามารถปรับวงจรให้ได้ตามความเหมาะสมครับ
สำหรับโดครงงานนี้เป็นการนำบอร์ไมโครคอนโทรลเลอร์ NodeMCU ESP32 Devkit มาประยุกต์ใช้งานอีกแบบหนึ่ง โดยอาศัยการต่อร่วมกับบอร์ดขับมอเตอร์ L298 ในการขับกำลังมอเตอร์กระแสตรง (DC Motor) อีกส่วนหนึ่ง ซึ่งทั้งนี้บอร์ดขับมอเตอร์ L298 จะสามารถรับสัญญาณควบคุมแบบ TTL ได้เป็นอย่างดี ซึ่งยังเป็นประโยชน์สำหรับนักออกแบบและพัฒนาในด้านไมโครคอนโทรลเลอร์ได้มากขึ้นครับ.
Reference
- https://randomnerdtutorials.com/esp32-dc-motor-l298n-motor-driver-control-speed-direction/
- http://acoptex.com/project/1245/basics-project-072u-esp32-development-board-with-dc-motor-and-l298n-h-bridge-motor-driver-module-at-acoptexcom/
- https://create.arduino.cc/projecthub/KDPA/esp32-cam-video-surveillance-robot-a22367
- https://robojax.com/learn/arduino/?vid=robojax_ESP32_DC_motor_L298N_WiFi