ADS1115 Resolution ADC Module and I2C Protocol Interface with Arduino UNO
บทความนี้การใช้งานโมดูลแปลงสัญญาณอะนาลอกเป็นดิจิตอล ADS1115 ที่ให้ความละเอียดขนาด 16 Bit และใช้การสื่อสารระหว่างบอร์ดความคุมต่างๆ แบบ I2C Protocol ซึ่งช่วยให้นำมาใช้งานได้ง่าย ใช้สายไฟเชื่อมต่อน้อยและความเร็วในการสื่อสารที่สูง โดยโมดูลตัวนี้เหมาะสำหรับการอ่านค่าสัญญาณอะนาลอกที่ต้องการความแม่นยำที่ค่อนข้างสูง และยังสามารถเป็นโมดูลที่จะช่วยให้บอร์ดไมโครคอนโทรลเลอร์ต่างๆ อ่านค่าได้เพิ่มขึ้นอีก 4 ช่อง ทั้งยังมีตัวอย่างโปรแกรมไลบารี่ให้ดาน์โหลดเพื่อทดลองหรือใช้งานได้จากหลายแหล่งอีกด้วย
Datasheet for ADS111x Analog-to-digital converters 16-Bit Resolution
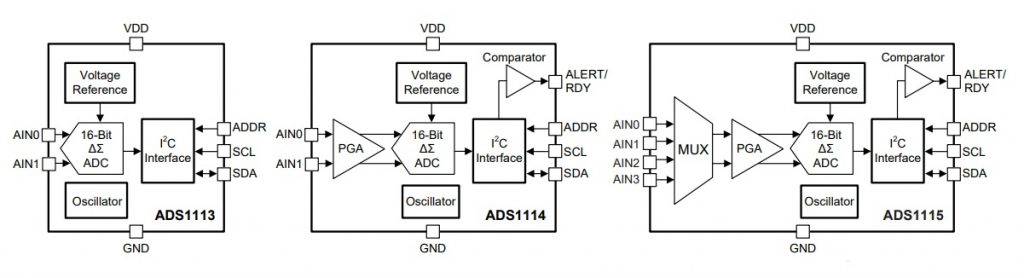
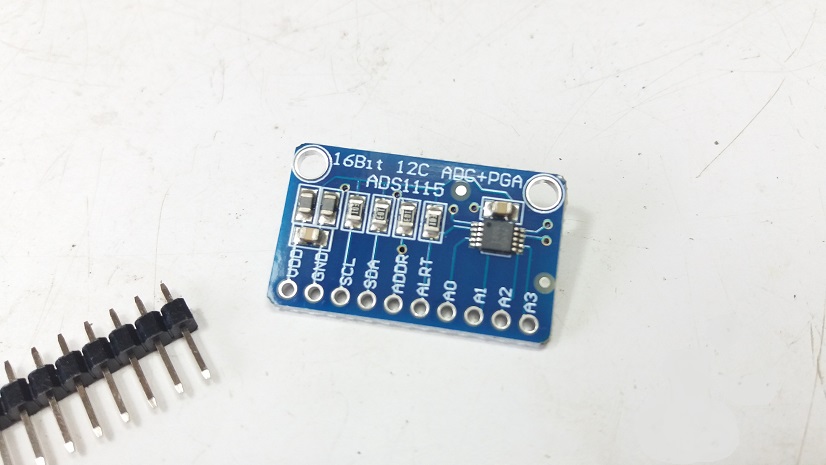
รูปที่ 1 และรูปที่ 2 โมดูลแปลงสัญญาณอะนาลอกเป็นดิจิตอล ADS1115 ที่สามารถหาซื้อออนไลน์ได้ทั่วไป และบล๊อกไดอะแกรมวงจรภายในตัวชิฟไอซี โดยรายละเอียดการใช้งานแนะนำให้เข้าไปตามลิ้งก์อ้างอิงอ้างอิงข้างล่าง ซึ่งช่วยให้เข้าใจการทำงานของชิฟตัวนี้มากยิ่งขึ้น
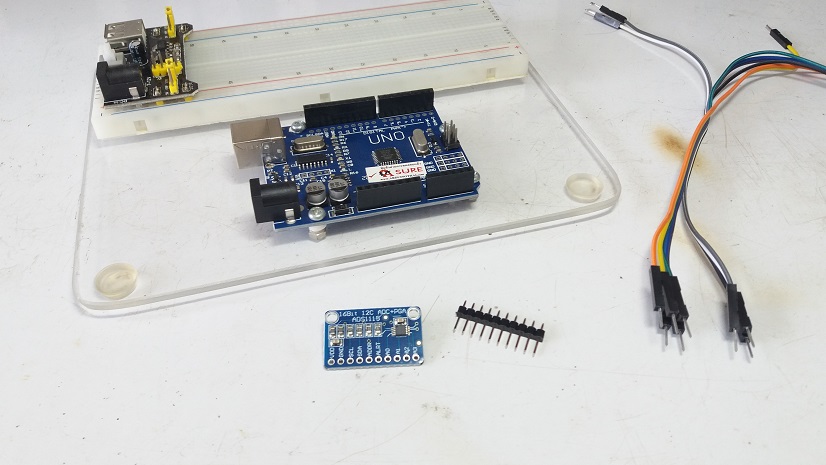
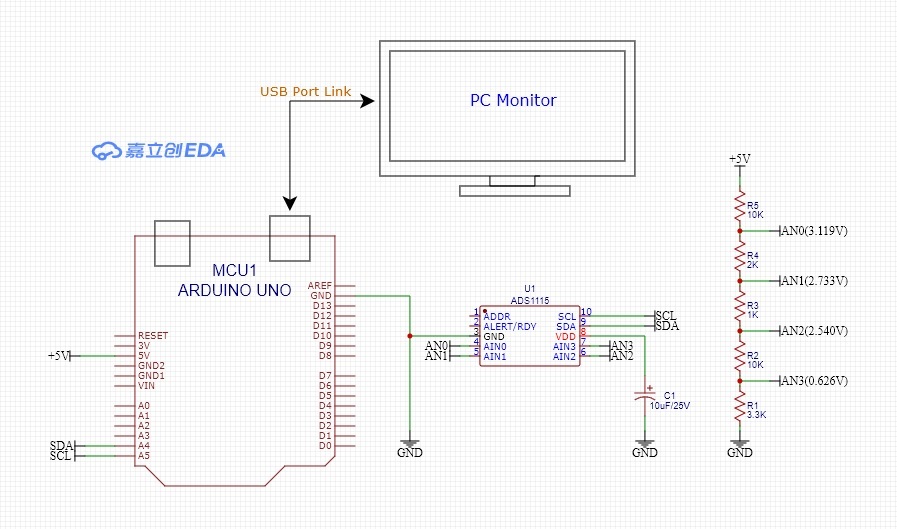
รูปที่ 3 แสดงอุปกรณ์ต่างๆ สำหรับทดลอง โดยในการทดลองนี้จะใช้บอร์ดควบคุม Arduino UNO และบอร์ดทดลองอเนกประสงค์ (Protoboard) ซึ่งจะช่วยทดลองวงจรได้ง่ายและเร็วขึ้น ทั้งนี้การต่อวงจรเข้าด้วยกันจะใช้อุปกรณ์ไม่มากนัก


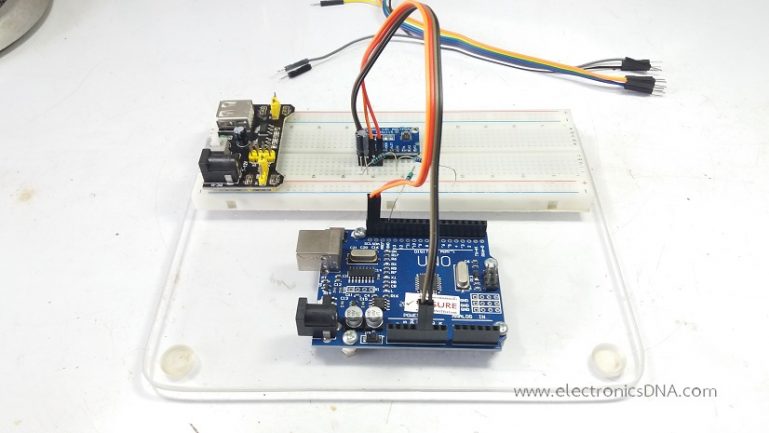
รูปที่ 5 แสดงลักษณะของการทดลองและทำการวัดค่าแรงดันที่ขาอินพุตอะนาลอกให้กับโมดูล ADS1115 ทั้ง 4 ช่องคือ AIN0-AIN3 โดยในการทดลองจะกำหนดเป็นโหมดแบบแยกการวัดสัญญาณอินพุต 4 ช่อง อิสระหรือเรียกซิงเกิลเอ็น (Single-ended)
Arduino Library for ADS1115 Module
/* Arduino Code Program : https://github.com/thingSoC/TSOC_GROVEY_ADC/tree/master/libraries/Adafruit_ADS1X15/examples
*/
#include <Wire.h>
#include <Adafruit_ADS1015.h>
Adafruit_ADS1115 ads; /* Use this for the 16-bit version */
//Adafruit_ADS1015 ads; /* Use thi for the 12-bit version */
float Voltage0,Voltage1,Voltage2,Voltage3;
void setup(void)
{
Serial.begin(9600);
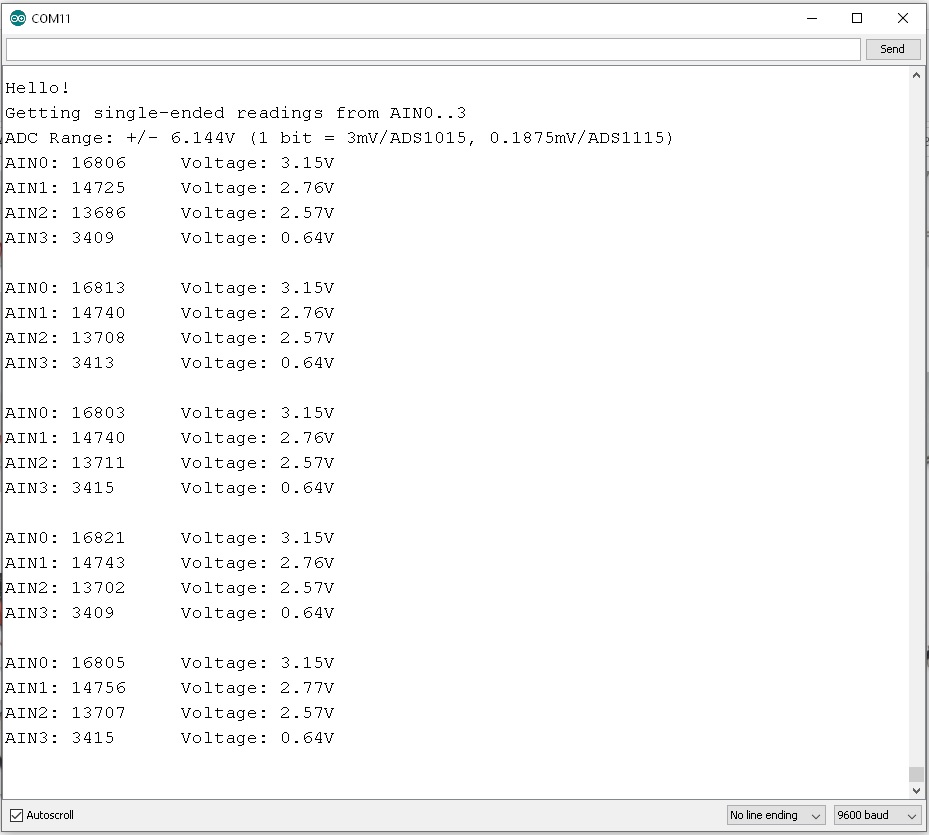
Serial.println("Hello!");
Serial.println("Getting single-ended readings from AIN0..3");
Serial.println("ADC Range: +/- 6.144V (1 bit = 3mV/ADS1015, 0.1875mV/ADS1115)");
// The ADC input range (or gain) can be changed via the following
// functions, but be careful never to exceed VDD +0.3V max, or to
// exceed the upper and lower limits if you adjust the input range!
// Setting these values incorrectly may destroy your ADC!
// ADS1015 ADS1115
// ------- -------
// ads.setGain(GAIN_TWOTHIRDS); // 2/3x gain +/- 6.144V 1 bit = 3mV 0.1875mV (default)
// ads.setGain(GAIN_ONE); // 1x gain +/- 4.096V 1 bit = 2mV 0.125mV
// ads.setGain(GAIN_TWO); // 2x gain +/- 2.048V 1 bit = 1mV 0.0625mV
// ads.setGain(GAIN_FOUR); // 4x gain +/- 1.024V 1 bit = 0.5mV 0.03125mV
// ads.setGain(GAIN_EIGHT); // 8x gain +/- 0.512V 1 bit = 0.25mV 0.015625mV
// ads.setGain(GAIN_SIXTEEN); // 16x gain +/- 0.256V 1 bit = 0.125mV 0.0078125mV
ads.begin();
}
void loop(void)
{
int16_t adc0, adc1, adc2, adc3;
adc0 = ads.readADC_SingleEnded(0);
adc1 = ads.readADC_SingleEnded(1);
adc2 = ads.readADC_SingleEnded(2);
adc3 = ads.readADC_SingleEnded(3);
Serial.print("AIN0: "); Serial.print(adc0); Voltage0 = (adc0 * 0.1875)/1000; Serial.print("\tVoltage: "); Serial.print(Voltage0);Serial.println("V");
Serial.print("AIN1: "); Serial.print(adc1); Voltage1 = (adc1 * 0.1875)/1000; Serial.print("\tVoltage: "); Serial.print(Voltage1);Serial.println("V");
Serial.print("AIN2: "); Serial.print(adc2); Voltage2 = (adc2 * 0.1875)/1000; Serial.print("\tVoltage: "); Serial.print(Voltage2);Serial.println("V");
Serial.print("AIN3: "); Serial.print(adc3); Voltage3 = (adc3 * 0.1875)/1000; Serial.print("\tVoltage: "); Serial.print(Voltage3);Serial.println("V");
Serial.println(" ");
delay(1000);
}
ตัวอย่างโปรแกรมทำงานข้างบนจะเป็นการทำงานในโหมด Single-Ended ซึ่งเราสามารถเลือกโหมดการใช้งานได้ตามต้องการ ซึ่งจะมีตัวอย่างมาพร้อมภยในไฟล์ไลบารี่และตัวอย่างแบบอย่างที่อยู่ตามลิ้งก์อ้างอิงข้างล่างบทความนี้เช่นกัน ในส่วนที่จะแนะนำของโปรแกรมนี้คือ จะต้องเลือกเบอร์ซิฟไอซีให้ถูกต้อง เช่น ADS1115 หรือ ADS1015 (จะอยู่บรรทัดบน) และการกำหนดอัตราการขยายสัญญาณอินพุต (ADC input range) ซึ่งโดยปกติจะกำหนดเป็น (Default) ค่าเริ่มต้นที่ 2/3x gain, +/- 6.144V, 1 bit = 3mV 0.1875mV

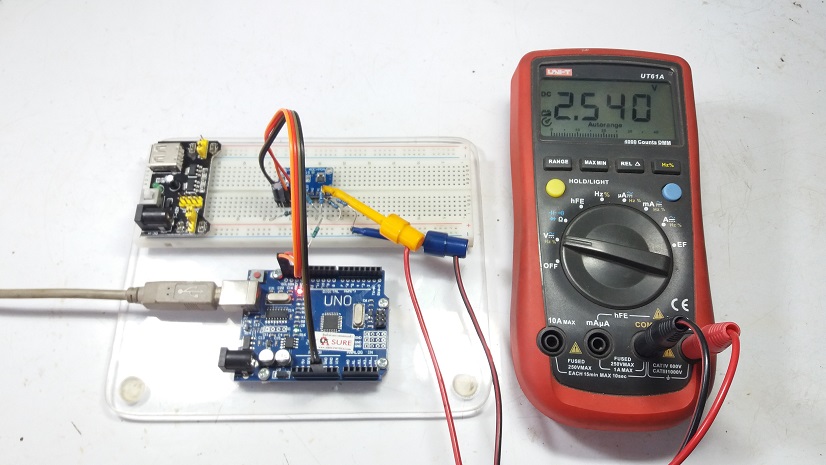

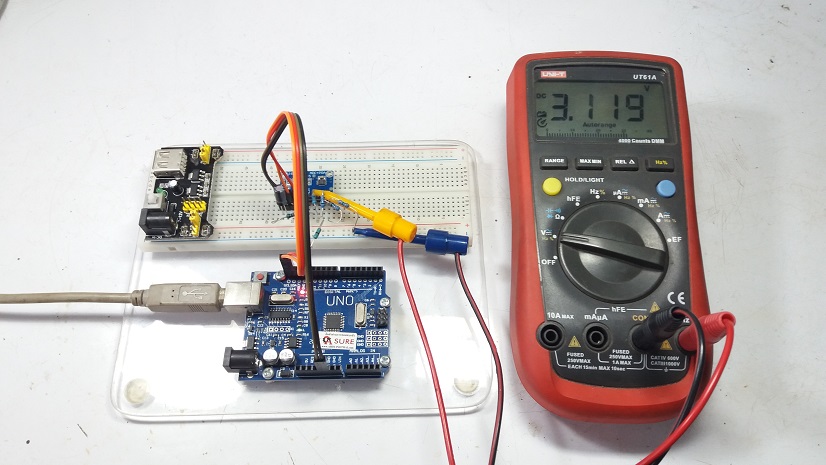
สำหรับในรูปที่ 6 ถึงรูปที่ 9 จะเป็นการวัดค่าแรงดันที่กำหนดตำแหน่งขา AIN0 ถึง AIN3 ทั้งนี้เพื่อนำไปเปรียบเทียบกับค่าแรงดันที่วัดได้จากโมดูล ADS1115 เพื่อตรวจสอบความถูกต้องการทำงานหรือปรับแต่งโปรแกรมการทำงานให้เป็นไปตามที่ต้องการอีกครั้ง
ในการทดลองใช้งานโมดูลในแปลงสัญญาณอะนาลอกเป็นดิจิตอล ADS1115 นี้ เพื่อเป็นอุปกรณ์หนึ่งสำหรับนำไปใช้ในการตรวจจับค่าแรงดันและกระแสไฟฟ้า รวมทั้งอุณหภูมิที่เกิดขึ้นในวงจรสวิตชิ่ง เพาเวอร์ซัพพลาย หรือวงจรคอนเวอร์เตอร์ต่างๆ ที่จะช่วยให้มีความแม่นยำของการควบคุมการทำงานเพิ่มขึ้น และจะนำเนื้อหาการทดลองและประยุกต์ใช้งานโมดูลนี้มาแชร์ให้ผู้อ่านในโอกาสต่อไปครับ.
Reference
- https://www.ti.com/lit/ds/symlink/ads1115.pdf
- https://how2electronics.com/how-to-use-ads1115-16-bit-adc-module-with-arduino/
- https://github.com/RobTillaart/ADS1X15/tree/master/examples
- https://learn.adafruit.com/adafruit-4-channel-adc-breakouts/arduino-code
- https://www.circuits-diy.com/interfacing-ads1115-16-bit-adc-with-arduino/
- https://github.com/thingSoC/TSOC_GROVEY_ADC/tree/master/libraries/Adafruit_ADS1X15
- https://microcontrollerslab.com/ads1115-external-adc-with-esp32/