Simple Temperature Control by using Fuzzy Logic Control Based on Arduino [EP2]
โครงงานนี้เป็นเนื้อหาต่อจากบทความตอนที่ 1 จากการจำลองการทำงานให้กับการควบคุมอุณหภูมิแบบฟัซซี่ลอจิก (Fuzzy Logic Control : FLC) โดยใช้บอร์ดประมวลผล Arduino UNO โดยในโครงงานนี้จะเป็นการปรับโปรแกรมในส่วนการรับค่าอุณหภูมิทางด้านอินพุตให้สามารถต่อกับเซนเซอร์จริง และในส่วนของเอาต์พุตให้สามารถส่งสัญญาณพัลซ์วิดมอดูเลตชั่น (PWM Signal) ในการควบคุมการทำงานของโหลดเพิ่มเติมจากการแสดงค่าเปอร์เซนต์การทำงานแบบเดิม โดยในเบื้องต้นก่อนต่อวงจรจริงทั้งหมดจะจำลองโปรแกรมการทำงานบนเว็บไซต์ www.tinkercad.com อีกครั้ง
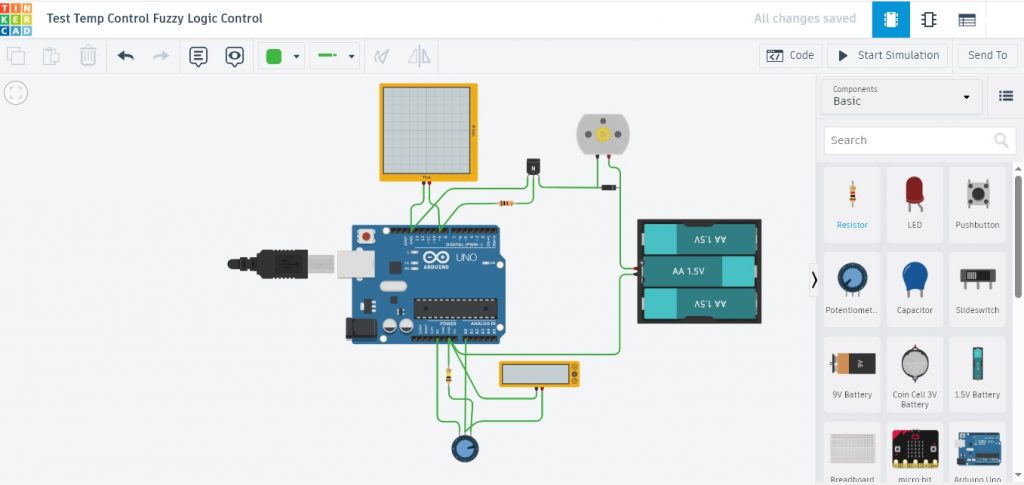
ในรูปที่ 1 แสดงอุปกรณ์ที่ใช้ในการจำลองการควบคุมแบบฟัซซี่ลอจิก ซึ่งประกอบด้วยบอร์ดประมวลผล Arduino UNO, ตัวต้านทานปรับค่าสำหรับปรับค่าแรงดันในช่วง 1.5-3.5V (เป็นค่าอินพุตให้กับระบบฟัซซี่ลอจิก) เพื่อใช้จำลองค่าอุณหภูมิให้อยู่ในช่วง 0-40°C, และโวลต์มิเตอร์แสดงค่าแรงดันที่ได้จากการปรับค่าความต้านทานเพื่อป้อนเข้ามายังขา A0 ในส่วนของผลลัพธ์ (ค่าเอาต์พุตของระบบฟัซซี่ลอจิก) จะให้แสดงผลมายังหน้าต่าง Serial Monitor ของโปรแกรมจำลองการทำงาน รวมทั้งจอออสซิลโลสโคปวัดสัญญาณพัลซ์วิดมอดูเลตชั่นและตัวมอเตอร์กระแสตรง (มอเตอร์พัดลม) เพิ่มขึ้นจาก EP1
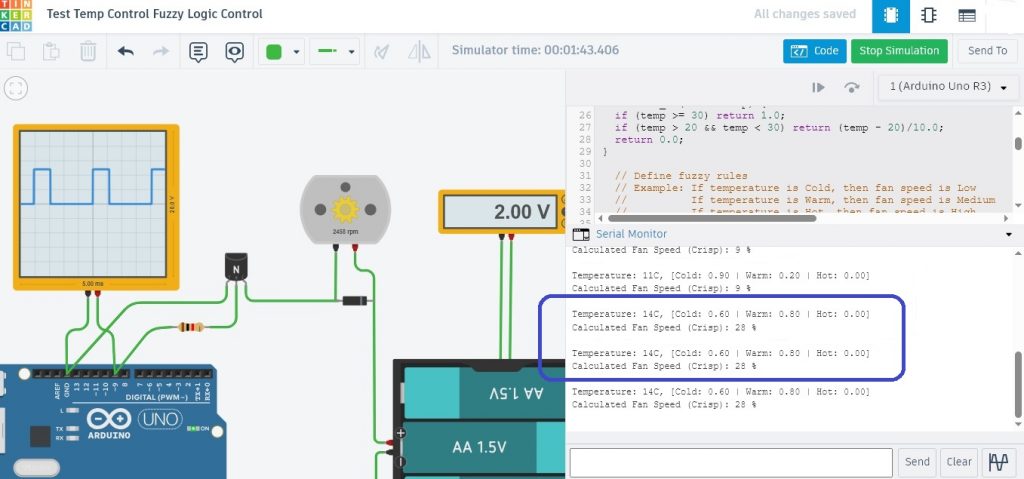
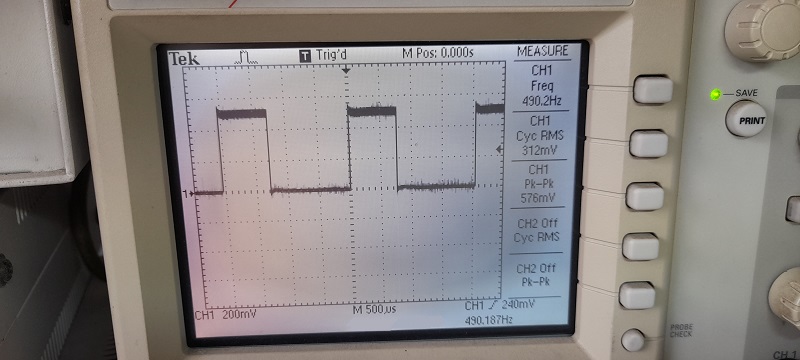
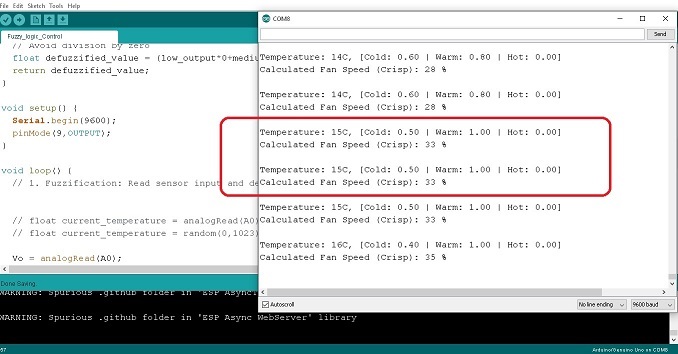
รูปที่ 2 แสดงผลการทดลองการทำงานที่ 1 เมื่อปรับแรงดันไปยังขา A0 เท่ากับ 2V สังเกตค่าอุณหภูมิที่ได้จะเท่ากับ 14°C ทำให้ได้ค่า Membership function คือ Cold = 0.60 , Warm = 0.80 และ Hot = 0.00 ตามลำดับ (ในกรอบสีน้ำเงิน) และสัญญาณพัลซ์วิดมอดูเลตชั่นจะเท่ากับ 28% ความเร็วรอบมอเตอร์เท่ากับ 2458rpm ในการปรับอุณหภูมิให้เหมาะสม
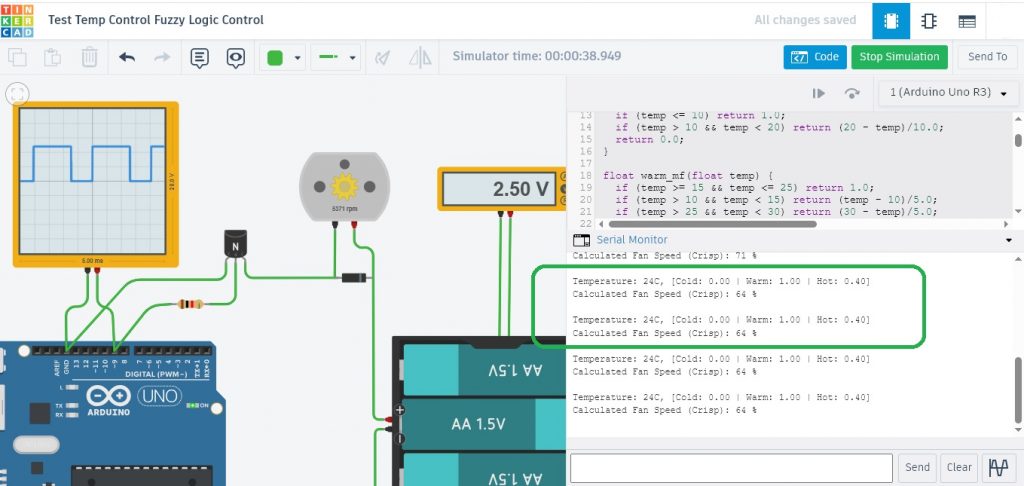
รูปที่ 3 แสดงผลการทดลองการทำงานที่ 2 เมื่อปรับแรงดันไปยังขา A0 เท่ากับ 2.5V สังเกตค่าอุณหภูมิที่ได้จะเท่ากับ 24°C ทำให้ได้ค่า Membership function คือ Cold = 0.00 , Warm = 1.00 และ Hot = 0.40 ตามลำดับ (ในกรอบสีเขียว) และสัญญาณพัลซ์วิดมอดูเลตชั่นจะเท่ากับ 64% ความเร็วรอบมอเตอร์เท่ากับ 5371rpm
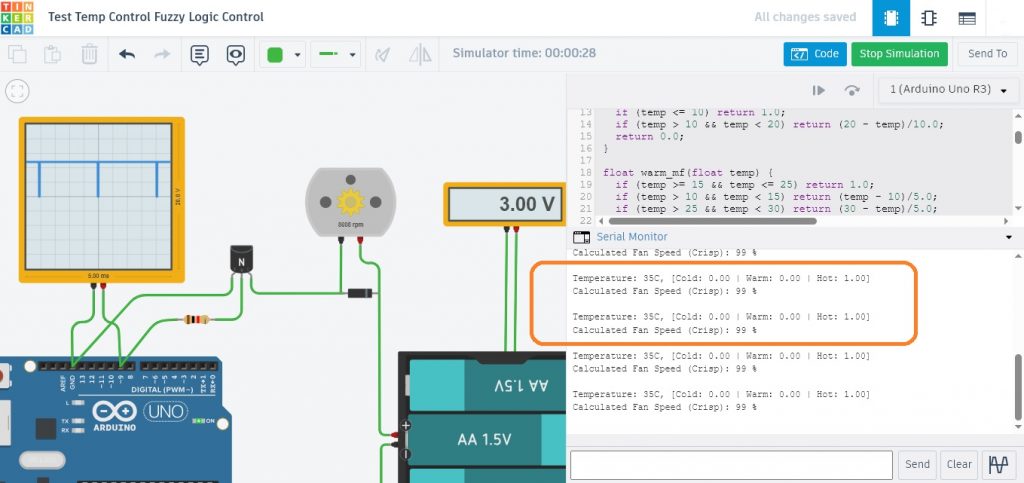
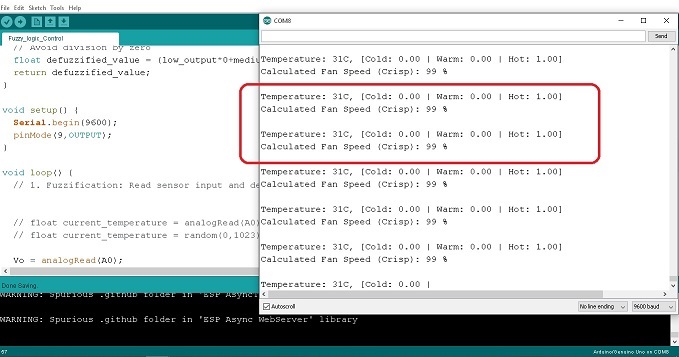
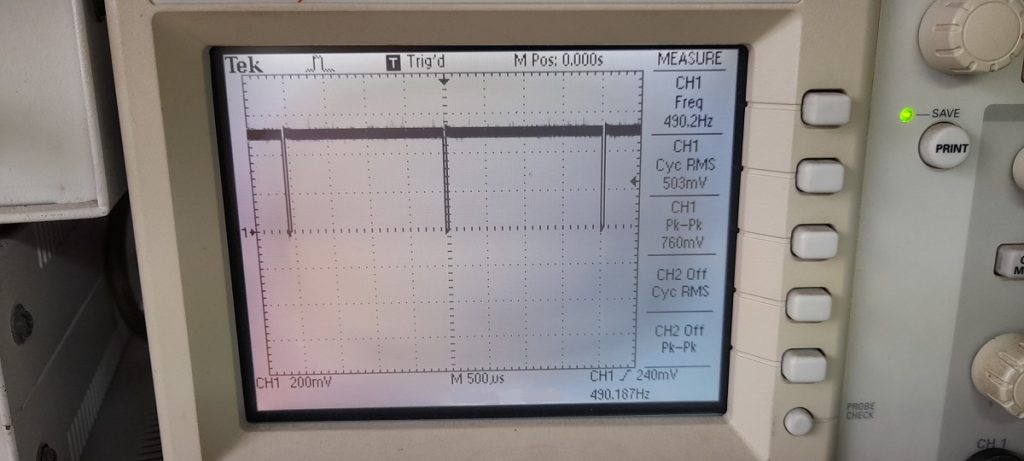
รูปที่ 4 แสดงผลการทดลองการทำงานที่ 3 เมื่อปรับแรงดันไปยังขา A0 เท่ากับ 2.5V สังเกตค่าอุณหภูมิที่ได้จะเท่ากับ 35°C ทำให้ได้ค่า Membership function คือ Cold = 0.00 , Warm = 0.00 และ Hot = 1.00 ตามลำดับ (ในกรอบสีส้ม) และสัญญาณพัลซ์วิดมอดูเลตชั่นจะเท่ากับ 99% ความเร็วรอบมอเตอร์เท่ากับ 8608rpm
  // Define linguistic terms and their corresponding membership functions
  // Example: For input 'temperature' with terms 'Cold', 'Warm', 'Hot'

  float R1 = 10000;
  float logR2, R2, T;
  int Tc;
  float c1 = 1.009249522e-03, c2 = 2.378405444e-04, c3 = 2.019202697e-07;

float cold_mf(float temp) {
  if (temp <= 10) return 1.0;
  if (temp > 10 && temp < 20) return (20 - temp)/10.0;
  return 0.0;
}

float warm_mf(float temp) {
  if (temp >= 15 && temp <= 25) return 1.0;
  if (temp > 10 && temp < 15) return (temp - 10)/5.0;
  if (temp > 25 && temp < 30) return (30 - temp)/5.0;
  return 0.0;
}

float hot_mf(float temp) {
  if (temp >= 30) return 1.0;
  if (temp > 20 && temp < 30) return (temp - 20)/10.0;
  return 0.0;
}

  // Define fuzzy rules
  // Example: If temperature is Cold, then fan speed is Low
  //          If temperature is Warm, then fan speed is Medium
  //          If temperature is Hot, then fan speed is High

  // Function for fuzzy inference (Mamdani-type example)
float infer_fan_speed(float cold_val, float warm_val, float hot_val) {
  // Assuming output terms for fan speed: Low, Medium, High
  // For simplicity, we'll use a weighted average for defuzzification
  // This is a simplified representation and may need adjustment based on specific defuzzification method

  float low_output = cold_val;      // If cold, fan speed is low
  float medium_output = warm_val;   // If warm, fan speed is medium
  float high_output = hot_val;      // If hot, fan speed is high

  // Defuzzification (Centroid method simplified for illustration)
  // In a real application, you'd define output membership functions and calculate centroid
  // Avoid division by zero
  float defuzzified_value = (low_output*0+medium_output*50+high_output*100)/(low_output+medium_output+high_output+0.001);
  return defuzzified_value;
}

void setup() {
  Serial.begin(9600);
  pinMode(9,OUTPUT);
}

void loop() {
  // 1. Fuzzification: Read sensor input and determine membership values

  int Vadc = analogRead(A0);
  R2 = R1 * (1023.0/(float)Vadc - 1.0);
  logR2 = log(R2);
  T = (1.0 / (c1 + c2*logR2 + c3*logR2*logR2*logR2));
  int  current_temperature = T - 273.15;   // Temperature °C

  float cold_membership = cold_mf(current_temperature);
  float warm_membership = warm_mf(current_temperature);
  float hot_membership = hot_mf(current_temperature);

  Serial.print("Temperature: ");
  Serial.print(current_temperature);
  Serial.print("C");
  Serial.print(", [Cold: ");
  Serial.print(cold_membership);
  Serial.print(" | Warm: ");
  Serial.print(warm_membership);
  Serial.print(" | Hot: ");
  Serial.print(hot_membership);
  Serial.println("] ");

  // 2. Fuzzy Inference: Apply fuzzy rules
  float fan_speed_output = infer_fan_speed(cold_membership, warm_membership, hot_membership);

  // 3. Defuzzification: Convert fuzzy output to a crisp value
  int crisp_fan_speed = (int)fan_speed_output; // Convert to integer for controlling a device

  Serial.print("Calculated Fan Speed (Crisp): ");
  Serial.print(crisp_fan_speed);
  Serial.println(" %");
  Serial.println("");

  // Control your output device (e.g., set PWM for fan speed)
  analogWrite(9,(255*crisp_fan_speed)/100);

  delay(1000); // Delay for demonstration
}
โปรแกรมการทำงานที่แสดงข้างบนโดยส่วนใหญ่จะเหมือนกับใน EP1 ซึ่งจะเพิ่มในส่วนของโปรแกรมคำสั่งรับค่าจากเซนเซอร์อุณหภูมิจริง int Vadc = analogRead(A0); จนถึงคำสั่ง int current_temperature = T – 273.15; // Temperature °C และในส่วนของการสร้างสัญญาณพัลซ์วิดมอดูเลตชั่นทางด้านเอาต์พุตที่คำสั่ง analogWrite(9,(255*crisp_fan_speed)/100); เพื่อให้สามารถนำไปขับโหลดได้จริง

Datasheet [NTC Thermistor for Temperature Measurement]
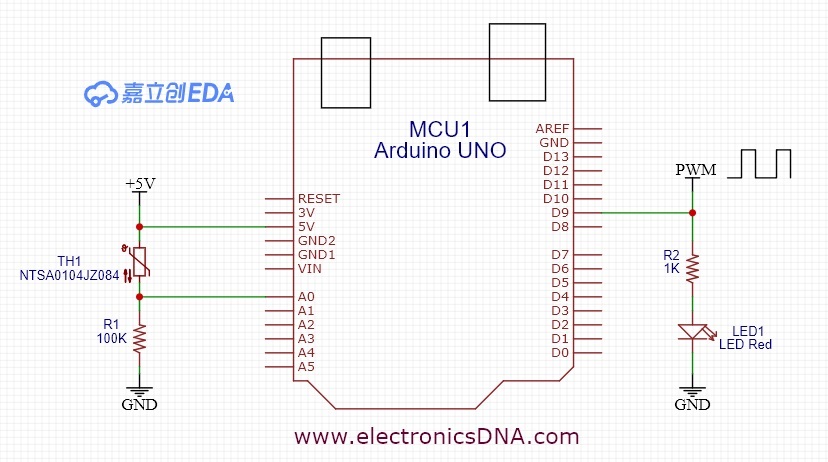
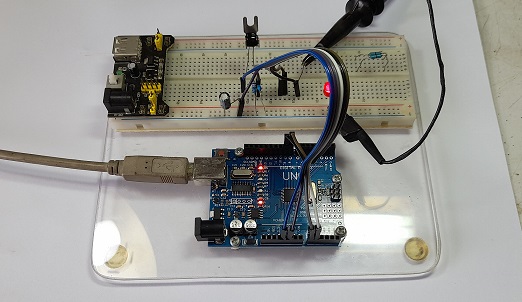
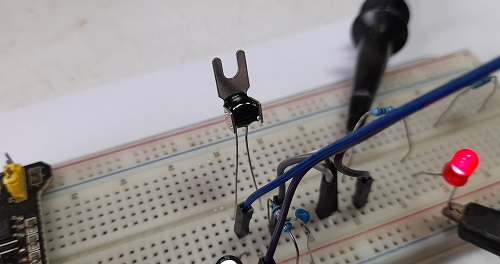
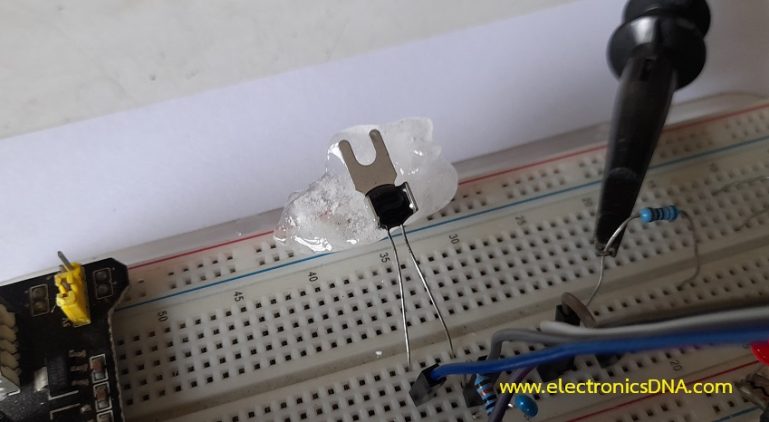
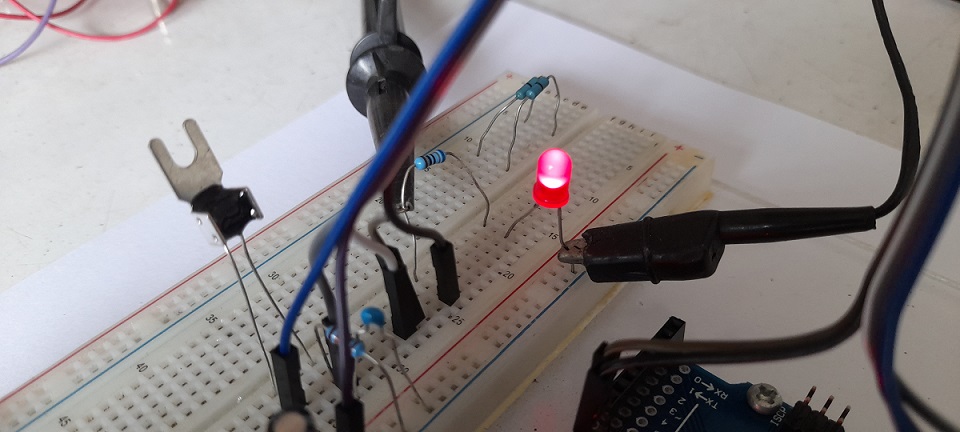
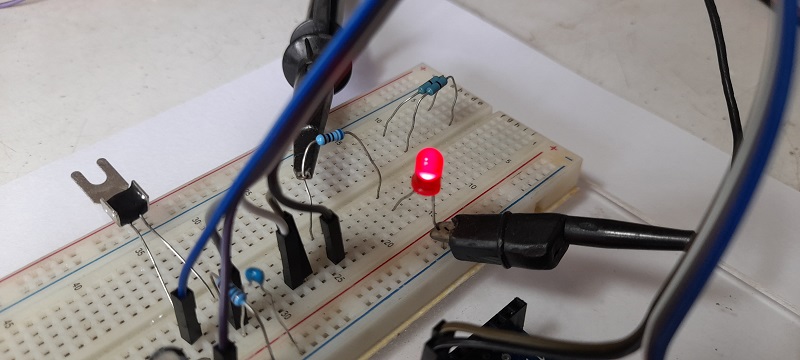
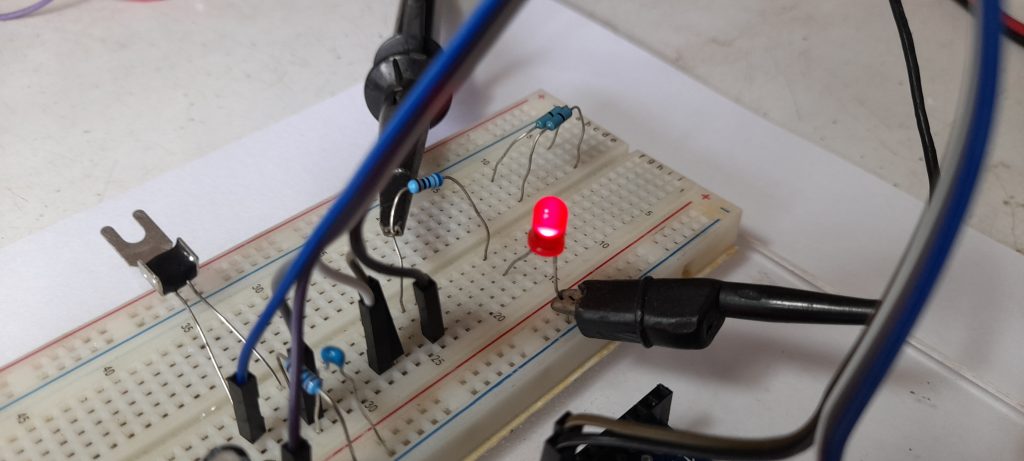
ในรูปที่ 6 ถึง 8 เป็นวงจรทดลองการทำงานสำหรับการควบคุมแบบฟัซซี่ลอจิก, ลักษณะการต่อวงจรจริงสำหรับทดลองและเซนเซอร์อุณหภูมิที่ใช้ในการทดลอง (NTSA0104JZ084) ในส่วนของสัญญาณพัลซ์วิดธ์มอดูเลตชั่นจะนำมาขับแอลอีดีเพื่อสังเกตการทำงาน โดยในกรณีที่เราต้องการขับมอเตอร์กระแสตรงที่เป็นพัดลมปรับอุณหภูมิ สามารถใช้ออปโต้คัปเปิ้ลและทรานซิสเตอร์กำลังจากการขับแอลอีดีได้ทันที


สำหรับโครงงานนี้เป็นทดลองควบคุมอุณหภูมิแบบฟัซซี่ลอจิก เพื่อปรับความเร็วมอเตอร์พัดลมให้อุณหภูมิอยู่ในช่วงที่ต้องการ (ประมาณ 25°C) โดยใช้บอร์ดประมวลผล Arduino UNO ด้วยการเขียนโปรแกรมควบคุมแบบฟัซซี่ลอจิกที่ไม่ซับซ้อนมากนักและจำลองการทำงานของวงจรทั้งหมดก่อนทดลองจริงบนเว็บไซต์ www.tinkercad.com ซึ่งแนวความคิดเบื้องต้นของการเรียนรู้เกี่ยวกับการควบคุมแบบฟัซซี่ลอจิกและสามารถนำไปประยุกต์ใช้ในพัฒนาโครงงานต่างๆ ตามต้องการต่อไป
Reference
- https://en.wikipedia.org/wiki/Fuzzy_control_system
- https://forum.arduino.cc/t/how-make-fuzzy-logic-coding-for-arduino-uno/282381/4
- https://github.com/alvesoaj/eFLL
- https://github.com/amimaro/FuzzyLibrary
- https://fuzzylite.com/
- https://fuzzylite.com/downloads/FuzzyLite-Libraries.pdf
- https://www.microjpm.com/products/ad52300/
- https://c1555f5ec9.clvaw-cdnwnd.com/34662fcf1f1e607c561442431023ac8e/200010020-73ac173ac3/AD52300%20uJPM%20Datasheet.PDF
- https://www.tinkercad.com/dashboard
- https://www.circuitbasics.com/arduino-thermistor-temperature-sensor-tutorial/
- https://gemini.google.com/
- https://copilot.microsoft.com