Simple Temperature Control by using Fuzzy Logic Control Based on Arduino [EP4]
โครงงานการควบคุมอุณหภูมิแบบฟัซซี่ลอจิก (Fuzzy Logic Control : FLC) โดยใช้บอร์ด Arduino UNO ในตอนที่ 4 นี้จะเพิ่มการรับสัญญาณอินพุตเป็น 2 ส่วน และส่งสัญญาณเอาต์พุต 1 ช่อง ทั้งนี้เพื่อศึกษาการใช้คำสั่งในกรณีที่สัญญาณอินพุตมากกว่า 1 ส่วนขึ้นไป และยังคงใช้ไลบารี่ฟัซซี่ลอจิก <Fuzzy.h> ในการเขียนโปรแกรมเช่นเดิม ซึ่งในส่วนของสัญญาณอินพุตทั้ง 2 ช่องจะยังคงจำลองค่าอุณหภูมิในช่วง 0-40°C เพื่อให้เข้าใจได้ง่ายและสัญญาณเอาต์พุตจะเป็นพัลซ์วิดธ์มอดูเลตชั่นในการควบคุมโหลดต่างๆ
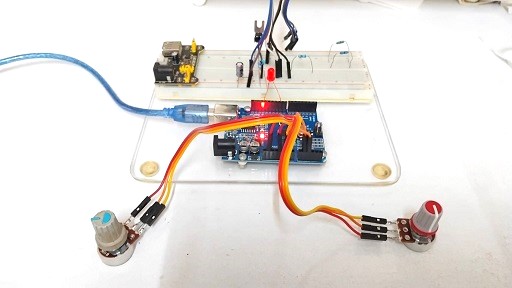
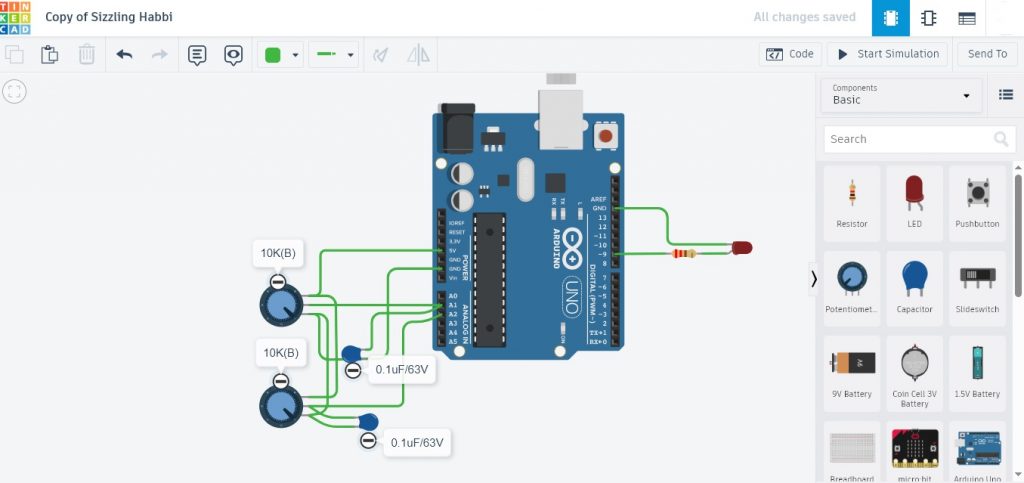
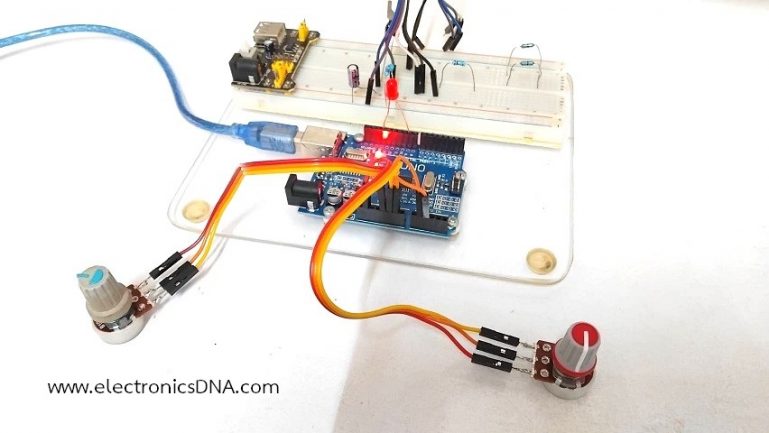
ในรูปที่ 1 และรูปที่ 2 แสดงลักษณะการต่ออุปกรณ์สำหรับทดลองและวงจรที่ใช้ในการทดลองการควบคุมแบบฟัซซี่ลอจิก โดยในการทดลองครั้งนี้จะใช้ตัวต้านทานปรับค่า (Variable Resistor : VR) จำนวน 2 ตัวเพื่อทดสอบการทำงานแทนค่าเซนเซอร์อุณหภูมิที่อ่านได้ในส่วนของอินพุตฟัซซี่ลอจิก ในส่วนเอาต์พุตสามารถส่งสัญญาณพัลซ์วิดธ์มอดูเลตชั่นที่ขา D13 (แอลอีดีบนบอร์ด Arduino) หรือต่อที่ขา D9 ก็ได้เช่นกัน ทั้งนี้เพื่อสังเกตผลที่ได้จากการทำงาน
Download Arduino Library Fuzzy logic Control
// Arduino_advanced_sample_V3
#include <Fuzzy.h>
Fuzzy *fuzzy = new Fuzzy(); // Fuzzy
// FuzzyInput1
FuzzySet *error_NB = new FuzzySet(0, 5, 10, 15);
FuzzySet *error_Z = new FuzzySet(10, 20, 20, 25);
FuzzySet *error_PS = new FuzzySet(20, 30, 40, 40);
// FuzzyInput2
FuzzySet *deltaError_NS = new FuzzySet(0, 5, 10, 15);
FuzzySet *deltaError_Z = new FuzzySet(10, 20, 20, 25);
FuzzySet *deltaError_PS = new FuzzySet(20, 30, 40, 40);
// FuzzyOutput
FuzzySet *slowOutput = new FuzzySet(1, 10, 20, 30);
FuzzySet *normalOutput = new FuzzySet(40, 50, 50, 60);
FuzzySet *quickOutput = new FuzzySet(70, 80, 100, 100);
void setup()
{
Serial.begin(9600); // Set the Serial output
pinMode(13,OUTPUT);
// Every setup must occur in the function setup()
// FuzzyInput1
FuzzyInput *error = new FuzzyInput(1);
error->addFuzzySet(error_NB);
error->addFuzzySet(error_Z);
error->addFuzzySet(error_PS);
fuzzy->addFuzzyInput(error);
// FuzzyInput2
FuzzyInput *deltaError = new FuzzyInput(2);
deltaError->addFuzzySet(deltaError_NS);
deltaError->addFuzzySet(deltaError_Z);
deltaError->addFuzzySet(deltaError_PS);
fuzzy->addFuzzyInput(deltaError);
// FuzzyOutput
FuzzyOutput *speedOutput = new FuzzyOutput(1);
speedOutput->addFuzzySet(slowOutput);
speedOutput->addFuzzySet(normalOutput);
speedOutput->addFuzzySet(quickOutput);
fuzzy->addFuzzyOutput(speedOutput);
//---- Building FuzzyRule (1)-----------------------------
FuzzyRuleAntecedent *iferror_NBAnddeltaError_NS = new FuzzyRuleAntecedent();
iferror_NBAnddeltaError_NS->joinWithAND(error_NB, deltaError_NS);
FuzzyRuleConsequent *thenSpeedSlow = new FuzzyRuleConsequent();
thenSpeedSlow->addOutput(slowOutput);
FuzzyRule *fuzzyRule1 = new FuzzyRule(1,iferror_NBAnddeltaError_NS, thenSpeedSlow);
fuzzy->addFuzzyRule(fuzzyRule1);
//---- Building FuzzyRule (2)-----------------------------
FuzzyRuleAntecedent *iferror_ZAnddeltaError_Z = new FuzzyRuleAntecedent();
iferror_ZAnddeltaError_Z->joinWithAND(error_Z, deltaError_Z);
FuzzyRuleConsequent *thenSpeednormal = new FuzzyRuleConsequent();
thenSpeednormal->addOutput(normalOutput);
FuzzyRule *fuzzyRule2 = new FuzzyRule(2,iferror_ZAnddeltaError_Z, thenSpeednormal);
fuzzy->addFuzzyRule(fuzzyRule2);
//---- Building FuzzyRule (3)-----------------------------
FuzzyRuleAntecedent *iferror_PSAnddeltaError_PS = new FuzzyRuleAntecedent();
iferror_PSAnddeltaError_PS->joinWithAND(error_PS, deltaError_PS);
FuzzyRuleConsequent *thenSpeedquick = new FuzzyRuleConsequent();
thenSpeedquick->addOutput(quickOutput);
FuzzyRule *fuzzyRule3 = new FuzzyRule(3,iferror_PSAnddeltaError_PS, thenSpeedquick);
fuzzy->addFuzzyRule(fuzzyRule3);
// Add more rules to cover all combinations for better control
// ...
}
void loop()
{
int Readtemp1 = analogRead(A1); // Read temperature pin A1
int input1 = map(Readtemp1, 0, 1023, 0, 40); // Map temperature range (0-40°C)
int Readtemp2 = analogRead(A2); // Read temperature pin A2
int input2 = map(Readtemp2, 0, 1023, 0, 40); // Map temperature range (0-40°C)
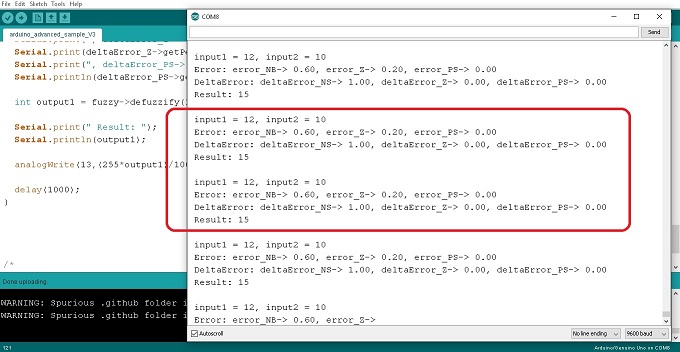
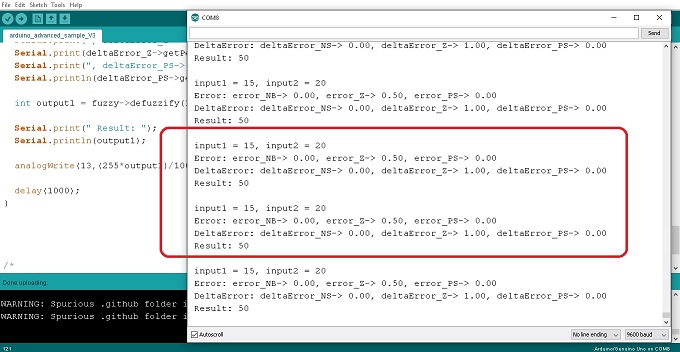
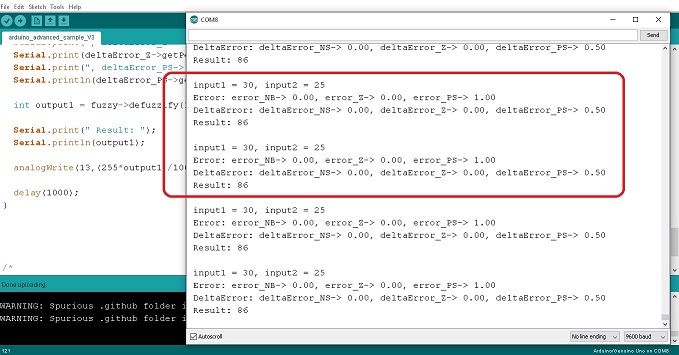
Serial.println(" ");
Serial.print(" input1 = "); // Error
Serial.print(input1);
Serial.print(", input2 = "); // DeltaError
Serial.println(input2);
fuzzy->setInput(1, input1);
fuzzy->setInput(2, input2);
fuzzy->fuzzify();
Serial.print(" Error: error_NB-> ");
Serial.print(error_NB->getPertinence());
Serial.print(", error_Z-> ");
Serial.print(error_Z->getPertinence());
Serial.print(", error_PS-> ");
Serial.println(error_PS->getPertinence());
Serial.print(" DeltaError: deltaError_NS-> ");
Serial.print(deltaError_NS->getPertinence());
Serial.print(", deltaError_Z-> ");
Serial.print(deltaError_Z->getPertinence());
Serial.print(", deltaError_PS-> ");
Serial.println(deltaError_PS->getPertinence());
int output1 = fuzzy->defuzzify(1);
Serial.print(" Result: ");
Serial.println(output1);
// analogWrite(13,(255*output1)/100);
delay(1000);
}
โปรแกรม Arduino สำหรับประมวลผลแบบฟัซซี่ลอจิกจะแบ่งออกเป็น 3 ส่วนคือ ในส่วนแรกที่คำสั่ง #include <Fuzzy.h> จะทำหน้าที่ประกาศใช้งานฟังก์ชั่นไลบารี่ฟัซซี่ลอจิก ถัดลงมาจะเป็นการกำหนดค่า FuzzyINPUT, FuzzyOUTPUT ส่วนที่สอง void setup() ที่หน้าที่กำหนดอัตราการสื่อสารของพอร์ตอนุกรมเท่ากับ 9600, FuzzyRule และการกำหนดความกว้างของสัญญาณพัลซ์วิดธ์มอดูเลตชั่นที่ขา D13 ด้วยคำสั่ง analogWrite(13,output); ส่วนที่สาม void loop() จะทำหน้าที่รับค่าสัญญาณอินพุตด้วยคำสั่ง int Readtemp1 = analogRead(A1); และ int Readtemp2 = analogRead(A2); จากนั้นจะใช้คำสั่ง int input = map(Readtemp, 0, 1023, 0, 40); เพื่อเปลี่ยนค่าที่อ่านได้ 0-1023 ให้อยู่ในช่วง 0-40 (หมายถึงช่วงอุณหภูมิ 0-40°C) และแสดงผลด้วยคำสั่ง Serial.print(input); จากนั้นจะเป็นคำสั่งให้ประมวลผล fuzzy->setInput(x, input); คำสั่ง fuzzy->fuzzify(); แสดงผลด้วยคำสั่ง Serial.print(Error:); , Serial.print(deltaError:); และคำสั่ง float output = fuzzy->defuzzify(1); ซึ่งจะได้ค่าเอาต์พุตออกมาที่ตัวแปร output เพื่อกำหนดสัญญาณพัลซ์วิดธ์มอดูเลตชั่นที่ขา D13
ในการทดลองนี้จะกำหนด FuzzyRule ไว้เพียง 3 ส่วนคือ
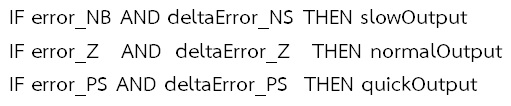
สำหรับการกำหนดกฏของฟัซซี่ลอจิกที่ตำแหน่ง Building FuzzyRule1, 2 และ 3 ในตัวอย่างนี้ ผู้ออกแบบระบบควบคุมจะต้องทดลองปรับให้ระบบการทำงานเป็นไปตามที่ต้องการ โดยสามารถปรับตัวเลขภายในหรือเพิ่มจำนวน FuzzyINPUT, FuzzyOUTPUT และกฏของฟัซซี่ลอจิก FuzzyRule ให้เหมาะสมกับระบบที่ต้องการควบคุมนั้นๆ ได้
สำหรับการควบคุมอุณหภูมิแบบฟัซซี่ลอจิก (Fuzzy Logic Control : FLC) โดยใช้บอร์ด Arduino UNO ในตอนที่ 4 นี้ จะเป็นการทดลองเพิ่มจำนวนอินพุตเป็น 2 ส่วน และส่งสัญญาณเอาต์พุต 1 ช่อง ทั้งนี้เพื่อศึกษาการใช้คำสั่งสำหรับ 2 อินพุต รวมทั้งการทดลองปรับตัวเลขภายใน FuzzyINPUT, FuzzyOUTPUT และกฏของฟัซซี่ลอจิก FuzzyRule โดยจะสังเกตลักษณะการทำงานที่เกิดขึ้น ทั้งนี้เพื่อให้เข้าใจการควบคุมอุณหภูมิแบบฟัซซี่ลอจิกได้อีกแบบหนึ่งและสามารถนำไปประยุกต์ใช้งานได้ง่ายขึ้น
Reference
- https://en.wikipedia.org/wiki/Fuzzy_control_system
- https://forum.arduino.cc/t/how-make-fuzzy-logic-coding-for-arduino-uno/282381/4
- https://github.com/alvesoaj/eFLL
- https://github.com/amimaro/FuzzyLibrary
- https://fuzzylite.com/
- https://fuzzylite.com/downloads/FuzzyLite-Libraries.pdf
- https://www.microjpm.com/products/ad52300/
- https://c1555f5ec9.clvaw-cdnwnd.com/34662fcf1f1e607c561442431023ac8e/200010020-73ac173ac3/AD52300%20uJPM%20Datasheet.PDF
- https://www.tinkercad.com/dashboard
- https://www.circuitbasics.com/arduino-thermistor-temperature-sensor-tutorial/
- https://gemini.google.com/
- https://copilot.microsoft.com