Simple S-Curve Motion Profile Based on Arduino UNO [EP1]
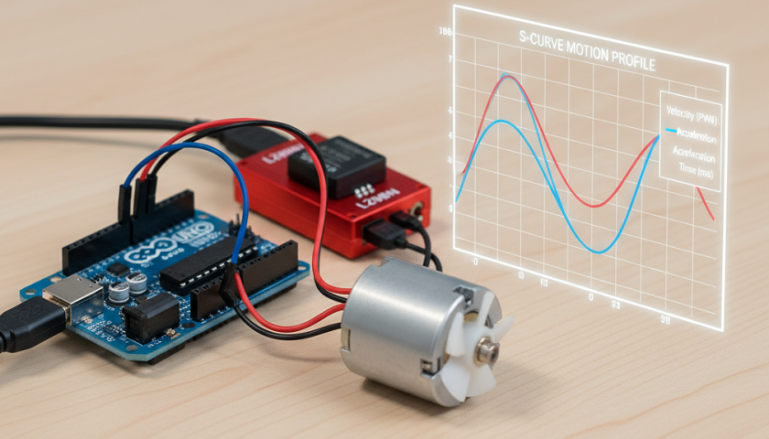
บทความนี้เป็นการเรียนรู้เกี่ยวกับการเคลื่อนที่รูปตัว S (S-curve Motion Profile) ซึ่งเป็นเทคนิคที่ใช้ในการควบคุมการเคลื่อนที่ของมอเตอร์ต่างๆ เช่น สเต็ปเปอร์มอเตอร์หรือเซอร์โวมอเตอร์ ด้วยการเปลี่ยนค่าในโปรแกรมเพื่อให้มอเตอร์ควบคุมการเคลื่อนที่ได้อย่างนุ่มนวล โดยเฉพาะในช่วงเร่งความเร็วเริ่มต้น ช่วงความเร็วคงที่ และช่วงลดความเร็ว ทั้งนี้การควบคุมการเคลื่อนที่แบบ S-curve Motion Profile ซึ่งช่วยลดการสั่นสะเทือน, ลดการทำงานผิดพลาดในการควบคุมและยังช่วยยืดอายุการใช้งานของอุปกรณ์ในระบบ ทั้งนี้การควบคุมการเคลื่อนที่แบบ S-curve Motion Profile จะใช้ฟังก์ชันทางคณิตศาสตร์มาคำนวณช่วงหน่วงเวลาระหว่างการเคลื่อนที่ (delay between steps) ของมอเตอร์ตามที่ผู้ออกแบบหรือพัฒนาระบบกำหนด
โปรไฟล์การเคลื่อนที่รูปตัว S แบ่งออกเป็น 3 ส่วนหลักคือ
- ช่วงเร่งความเร็ว (Acceleration Phase) ความเร็วเริ่มต้นจากศูนย์และเพิ่มขึ้นอย่างช้าๆ ในตอนแรก (เพื่อลดแรงกระชากในช่วงเริ่มต้น) จากนั้นความเร็วจะเร่งขึ้นอย่างรวดเร็ว เหมือนกับส่วนโค้งของตัว S ด้านล่าง
- ช่วงความเร็วคงที่ (Constant Speed Phase) มอเตอร์จะหมุนหรือเคลื่อนที่ด้วยความเร็วสูงสุด
- ช่วงลดความเร็ว (Deceleration Phase) ความเร็วเริ่มลดลงอย่างรวดเร็วในตอนแรก จากนั้นความเร็วจะลดลงอย่างช้าๆ จนหยุดสนิท (เพื่อลดแรงกระชากช่วงเริ่มหยุด) เหมือนกับส่วนโค้งของตัว S ด้านบน
สำหรับการทดลอง S-Curve Motion Profile ในตอนที่ 1 จะเป็นการทดลองให้บอร์ดควบคุม Arduino ส่งค่าสัญญาณพัลซ์วิดธ์มอดูเลตชั่นให้เกิดการเคลื่อนที่ 3 รูปแบบคือ รูปแบบที่ 1 ให้ความเร็วเริ่มต้นจาก 0 ไปสู่ค่าสูงสุด 255 (Ramp Up) รูปแบบที่ 2 ให้ความเร็วเริ่มต้นจากค่าสูงสุด 255 ไปที่ค่า 0 (Ramp Up) และรูปแบบที่ 3 จะให้รูปแบบที่ 1 และแบบที่ 2 ทำงานต่อเนื่องกัน (Ramp continuous) เพื่อศึกษาการทำงานและการนำไปใช้งาน
//  LAB1 : S-Curve Motion Profile (Ramp Up)

const int targetSpeed = 255;  // The maximum desired speed (e.g., for PWM)
const int totalSteps = 100;   // The number of steps to reach full speed
const int outputPin = 9;      // Example PWM pin (e.g., for an LED or motor)

// --- Variables ---
int currentStep = 0;
int currentSpeed = 0;

void setup() {
  pinMode(outputPin, OUTPUT);
  Serial.begin(9600);
}

void loop() {
  // --- 1. Acceleration (S-Curve Start) ---
  if (currentStep < totalSteps) {
    // Increment the step counter
    currentStep++;

    // Calculate a normalized value (0.0 to 1.0) for the current progress
    float progress = (float)currentStep / totalSteps;

    // Apply the S-Curve formula: y = 3x^2 - 2x^3 (smooth in/out)
    // This provides a smooth S-shaped transition for 'smoothingFactor' from 0.0 to 1.0
    float smoothingFactor = 3.0 * pow(progress, 2) - 2.0 * pow(progress, 3);

    // An even simpler S-curve approximation is: progress^3 (for acceleration)
    // float smoothingFactor = pow(progress, 3);

    // Calculate the new speed
    currentSpeed = (int)(smoothingFactor * targetSpeed);

    // Ensure the speed is within valid limits
    currentSpeed = constrain(currentSpeed, 0, targetSpeed);

    // Apply the speed (e.g., to a PWM pin)
    analogWrite(outputPin, currentSpeed);

    Serial.print("Step: ");
    Serial.print(currentStep);
    Serial.print(" | Smoothing Factor: ");
    Serial.print(smoothingFactor);
    Serial.print(" | Current Speed: ");
    Serial.println(currentSpeed);
    delay(20); // Control the rate of change
  } else {
    // When finished accelerating, hold the target speed
    analogWrite(outputPin, targetSpeed);
    Serial.println("Target Speed Reached. Holding.");
    // Wait for a bit before potentially starting a deceleration (not included here)
    // or resetting for another cycle.
  }
}
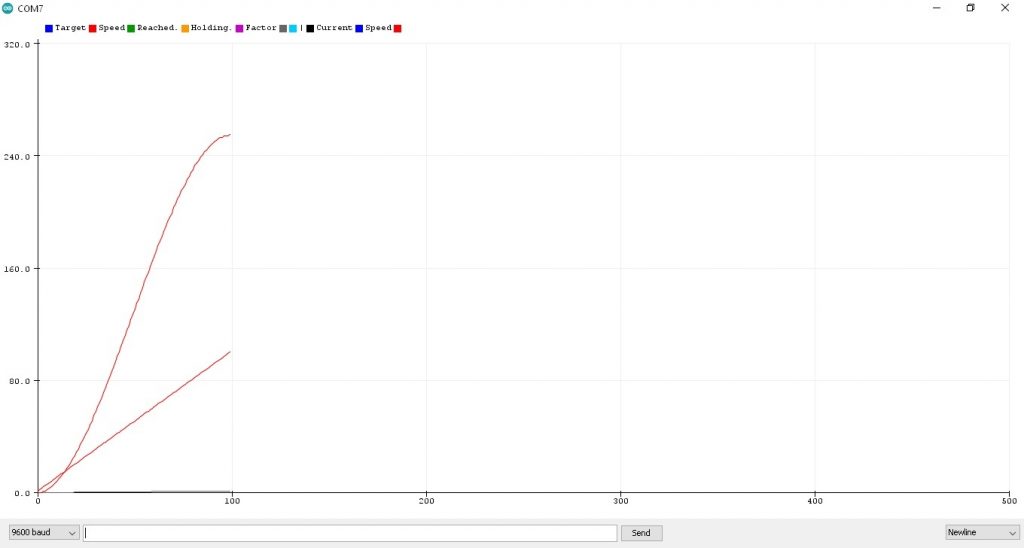
รูปที่ 1 กราฟแสดงค่าตัวแปร currentSpeed หน้าต่าง Serial Plotter จากโปรแกรมการทดลองที่ 1 LAB1 : S-Curve Motion Profile (Ramp Up) ซึ่งจะเห็นกราฟ 2 เส้นคือ เส้นแรกในลักษณะโค้งรูปตัว S จะเป็นช่วงการเริ่มต้นความเร็วจาก 0 ไปยังค่าสูงสุด 255 (PWM 8 bit 0-255) รูปกราฟเส้นที่สอง เป็นเส้นจำนวนนับในช่วง 0.0-1.0 (จำนวน 100 ค่า) ให้ลักษณะเชิงเส้น
// LAB2 : S-Curve Motion Profile (Ramp Down)

const int targetSpeed = 255;  // The maximum desired speed (e.g., for PWM)
const int totalSteps = 100;   // The number of steps to reach full speed
const int outputPin = 9;      // Example PWM pin (e.g., for an LED or motor)

// --- Variables ---
int currentStep = 0;
int currentSpeed = 0;

void setup() {
  pinMode(outputPin, OUTPUT);
  Serial.begin(9600);
}

void loop() {
  // --- 1. Acceleration (S-Curve Start) ---
  if (currentStep < totalSteps) {
    // Increment the step counter
    currentStep++;

    // Calculate a normalized value (0.0 to 1.0) for the current progress
    float progress = (float)currentStep / totalSteps;

    // Apply the S-Curve formula: y = 3x^2 - 2x^3 (smooth in/out)
    // This provides a smooth S-shaped transition for 'smoothingFactor' from 0.0 to 1.0
    float smoothingFactor = 3.0 * pow(progress, 2) - 2.0 * pow(progress, 3);

    // An even simpler S-curve approximation is: progress^3 (for acceleration)
    // float smoothingFactor = pow(progress, 3);

    // Calculate the new speed
    currentSpeed = (int)(smoothingFactor * targetSpeed);

    // Ensure the speed is within valid limits
    currentSpeed = constrain(currentSpeed, 0, targetSpeed);

    // Apply the speed (e.g., to a PWM pin)
    currentSpeed = (255-currentSpeed);
    analogWrite(outputPin, currentSpeed);

    Serial.print("Step: ");
    Serial.print(currentStep);
    Serial.print(" | Smoothing Factor: ");
    Serial.print(smoothingFactor);
    Serial.print(" | Current Speed: ");
    Serial.println(currentSpeed);

    delay(20); // Control the rate of change
  } else {
    // When finished accelerating, hold the target speed
    analogWrite(outputPin, targetSpeed);
    Serial.println("Target Speed Reached. Holding.");
    // Wait for a bit before potentially starting a deceleration (not included here)
    // or resetting for another cycle.
  }
}
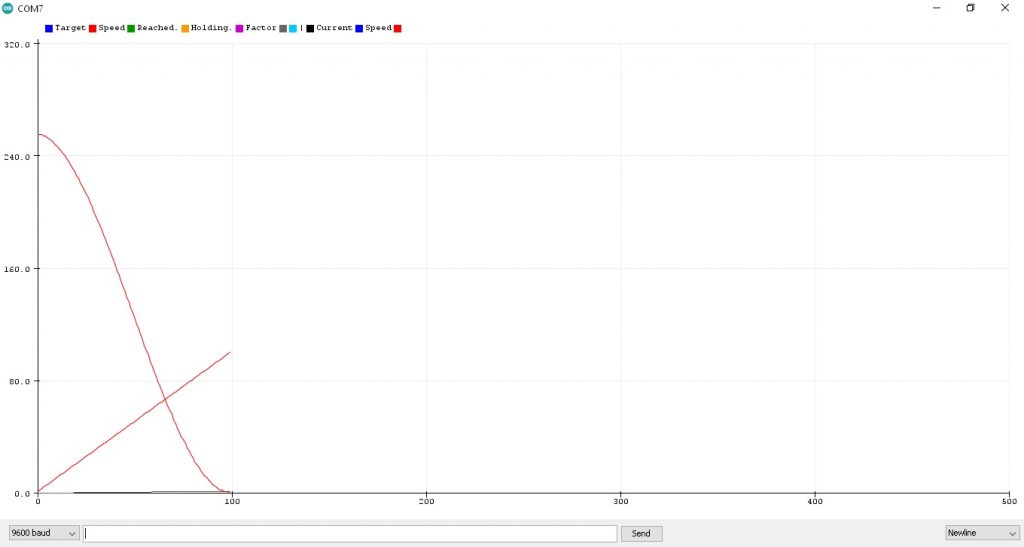
รูปที่ 2 กราฟแสดงค่าตัวแปร currentSpeed หน้าต่าง Serial Plotter จากโปรแกรมการทดลองที่ 2 LAB2 : S-Curve Motion Profile (Ramp Down) ซึ่งจะเห็นกราฟ 2 เส้นคือ เส้นแรกในลักษณะโค้งรูปตัว S จะเป็นช่วงความเร็วเริ่มลดลงจาก 255 ไปที่ค่าต่ำสุด 0 (PWM 8 bit 0-255) รูปกราฟเส้นที่สอง เป็นเส้นจำนวนนับในช่วง 0.0-1.0 (จำนวน 100 ค่า) ให้ลักษณะเชิงเส้น
// LAB3 : S-Curve Motion Profile (Ramp continuous)

const int targetSpeed = 255;  // The maximum desired speed (e.g., for PWM)
const int totalSteps = 100;   // The number of steps to reach full speed
const int outputPin = 9;      // Example PWM pin (e.g., for an LED or motor)

// --- Variables ---
int currentStep = 0;
int currentPWM = 0;

void setup() {
  pinMode(outputPin, OUTPUT);
  Serial.begin(9600);
}

void loop() {

loop1start:

  // --- 1. Acceleration (S-Curve Start) ---
  if (currentStep < totalSteps) {
    // Increment the step counter
    currentStep++;

    // Calculate a normalized value (0.0 to 1.0) for the current progress
    float progress = (float)currentStep / totalSteps;

    // Apply the S-Curve formula: y = 3x^2 - 2x^3 (smooth in/out)
    // This provides a smooth S-shaped transition for 'smoothingFactor' from 0.0 to 1.0
    float smoothingFactor = 3.0 * pow(progress, 2) - 2.0 * pow(progress, 3);

    // An even simpler S-curve approximation is: progress^3 (for acceleration)
    // float smoothingFactor = pow(progress, 3);

    // Calculate the new speed
    currentPWM = (int)(smoothingFactor * targetSpeed);

    // Ensure the speed is within valid limits
    currentPWM = constrain(currentPWM, 0, targetSpeed);

    // Apply the speed (e.g., to a PWM pin)
    analogWrite(outputPin, currentPWM);

    Serial.print("Step: ");
    Serial.print(currentStep);
    Serial.print(" | Smoothing Factor: ");
    Serial.print(smoothingFactor);
    Serial.print(" | Current Speed: ");
    Serial.println(currentPWM);

    delay(20); // Control the rate of change
    goto loop1start;
  }

 //++++++++++++++++++++++++++++++++++++++++++//

    currentStep = 0;
    currentPWM = 0;

 loop2start:

// --- 1. Acceleration (S-Curve Start) ---
  if (currentStep < totalSteps) {
    // Increment the step counter
    currentStep++;

    // Calculate a normalized value (0.0 to 1.0) for the current progress
    float progress = (float)currentStep / totalSteps;

    // Apply the S-Curve formula: y = 3x^2 - 2x^3 (smooth in/out)
    // This provides a smooth S-shaped transition for 'smoothingFactor' from 0.0 to 1.0
    float smoothingFactor = 3.0 * pow(progress, 2) - 2.0 * pow(progress, 3);

    // An even simpler S-curve approximation is: progress^3 (for acceleration)
    // float smoothingFactor = pow(progress, 3);

    // Calculate the new speed
    currentPWM = (int)(smoothingFactor * targetSpeed);

    // Ensure the speed is within valid limits
    currentPWM = constrain(currentPWM, 0, targetSpeed);

    // Apply the speed (e.g., to a PWM pin)
    currentPWM = (255-currentPWM);
    analogWrite(outputPin, currentPWM);

    Serial.print("Step: ");
    Serial.print(currentStep);
    Serial.print(" | Smoothing Factor: ");
    Serial.print(smoothingFactor);
    Serial.print(" | Current Speed: ");
    Serial.println(currentPWM);

    delay(20); // Control the rate of change
    goto loop2start;
  }

  currentStep = 0;
  currentPWM = 0;
  goto loop1start;
}
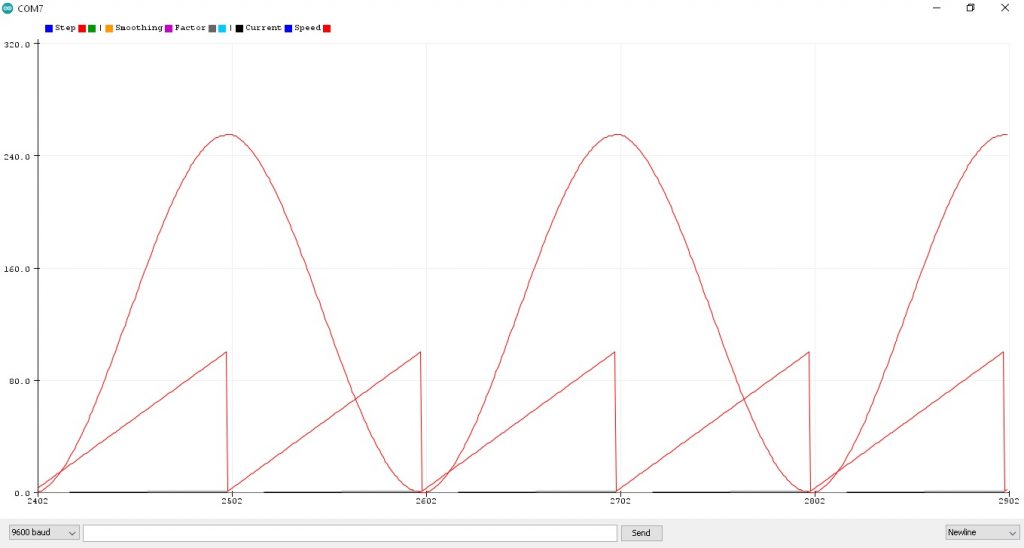
รูปที่ 3 กราฟแสดงค่าตัวแปร currentPWM หน้าต่าง Serial Plotter จากโปรแกรมการทดลองที่ 3 LAB3 : S-Curve Motion Profile (Ramp continuous) ซึ่งจะเห็นกราฟ 2 เส้นคือ เส้นแรกในลักษณะเป็นรูปสัญญาณไซน์ที่เกิดจากการนำโปรแกรมการทดลองที่ 1 และโปรแกรมที่ 2 มารวมกัน ในรูปจะสังเกตเห็นว่าจะมีความต่อเนื่องไปเรื่อยๆ ในส่วนของรูปกราฟเส้นที่สอง เป็นลักษณะฟันเลื่อย โดยรูปฟันเลื่อย 2 ส่วนจะเท่ากับ 1 คาบเวลาของสัญญาณรูปไซน์ และเป็นเส้นจำนวนนับในช่วง 0.0-1.0 (จำนวน 100 ค่า) เช่นเดียวกับการทดลองที่ 1 และ 2 นั้นเอง
Reference
- https://electronics.stackexchange.com/questions/38573/smooth-a-motor-movement
- https://forum.arduino.cc/t/stepper-motor-s-curve/465667
- https://wokwi.com/projects/387721175033470977
- https://www.littlechip.co.nz/blog/a-simple-stepper-motor-control-algorithm
- https://www.solomotorcontrollers.com/blog/motion-planning-servo-drives
- https://fightpc.blogspot.com/2018/04/testing-sinusoidal-s-curves.html
- https://www.motioncontroltips.com/what-is-a-motion-profile/
- https://fightpc.blogspot.com/2018/04/how-to-get-sinusoidal-s-curve-for.html?m=1
- https://twasp.info/public/paper/33.%20683-695%20%20B%20Article%20final.pdf
- https://www.mouser.com/blog/understand-motion-trajectory-profiles-effective-motor-control
- https://forum.arduino.cc/t/some-math-questions-acceleration-curves/50918/4
- https://forum.arduino.cc/t/s-curve-for-easydriver-v3-stepper-motor-driver/22749
- https://www.mdpi.com/1424-8220/23/6/3074